Anita Shackelford
Contact me  
  • Home
  • Digitized Patterns - DXF and QLI
  • Short Arm Patterns - Statler
  • Patterns in Multi-Formats
  • Made by Hand - Books, Templates, Needles
  • For sale
  • Statler Tutorials
  • Quilt Rescue
  • Red and Green Quilts
  • Kids at Work
  • About Anita
  • Contact
  • What's New
  • Store

Beginnings

1/28/2021

1 Comment

 
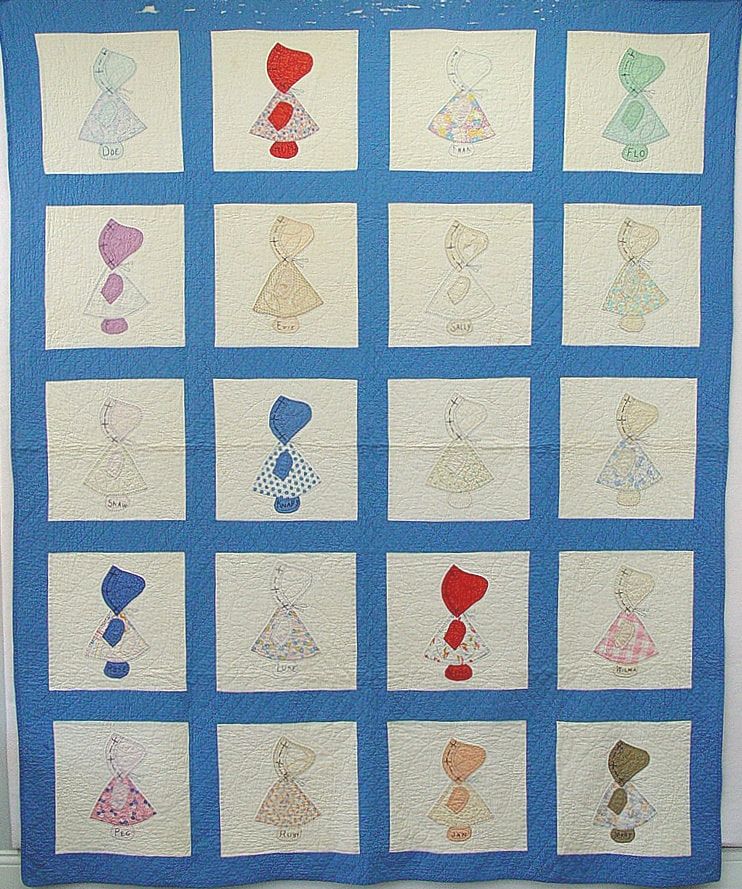
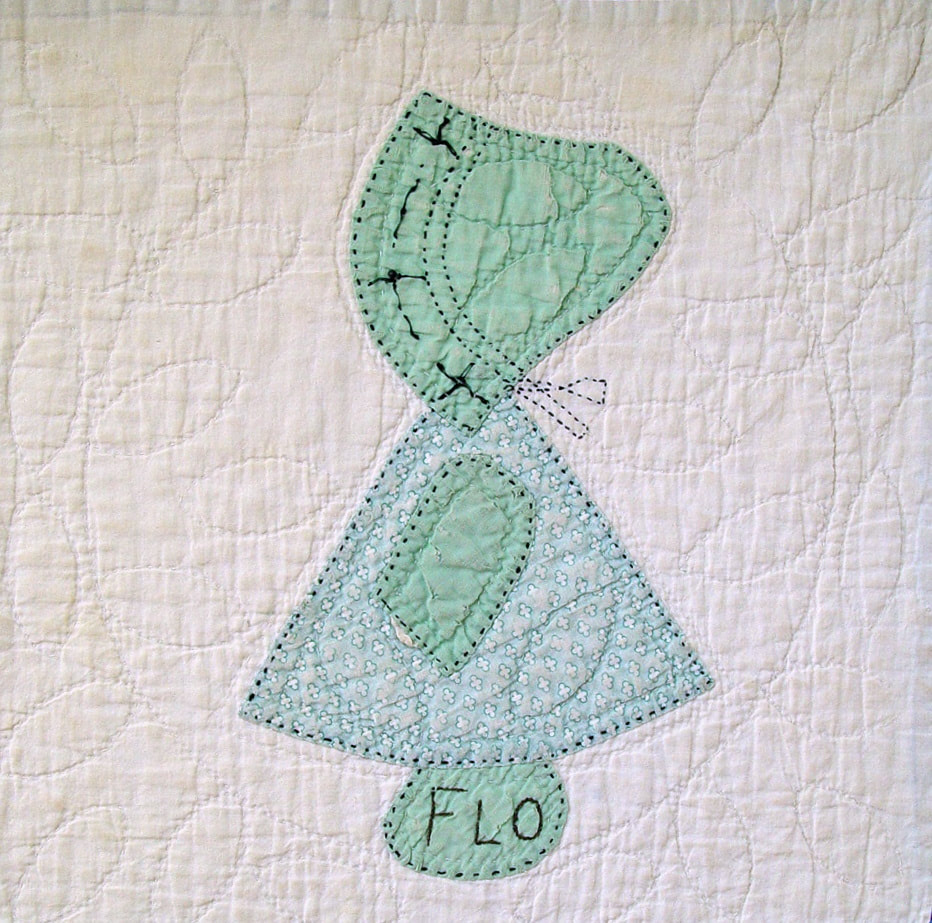
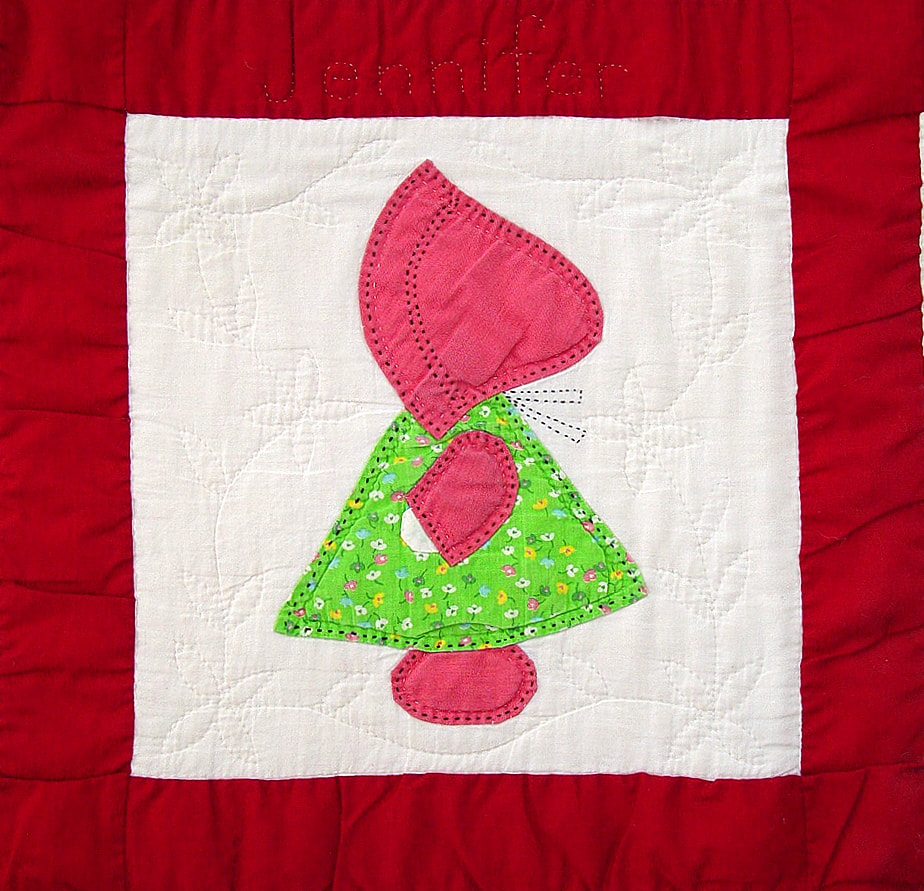
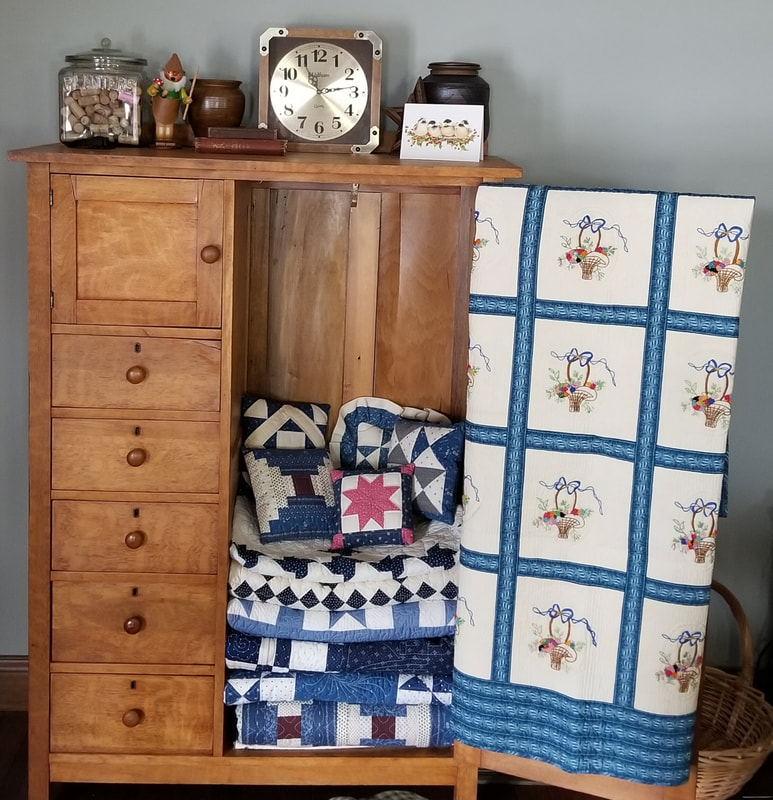
My grandmother was a quiltmaker. I never saw her work on her quilts, but I have several that she made. When her daughters were young, she made each of them a Sunbonnet Sue. The pattern was popular in the 1940s and a good choice for girls. She made it in the typical style with a variety of prints for the dresses and coordinating solids for the hats and shoes. To personalize the quilts, she collected fabrics from schoolmates for each of the dresses and embroidered the friends’ names on the blocks. The appliqué blocks were set with a fairly wide sashing and of course, hand quilted.
Picture
Picture
Picture

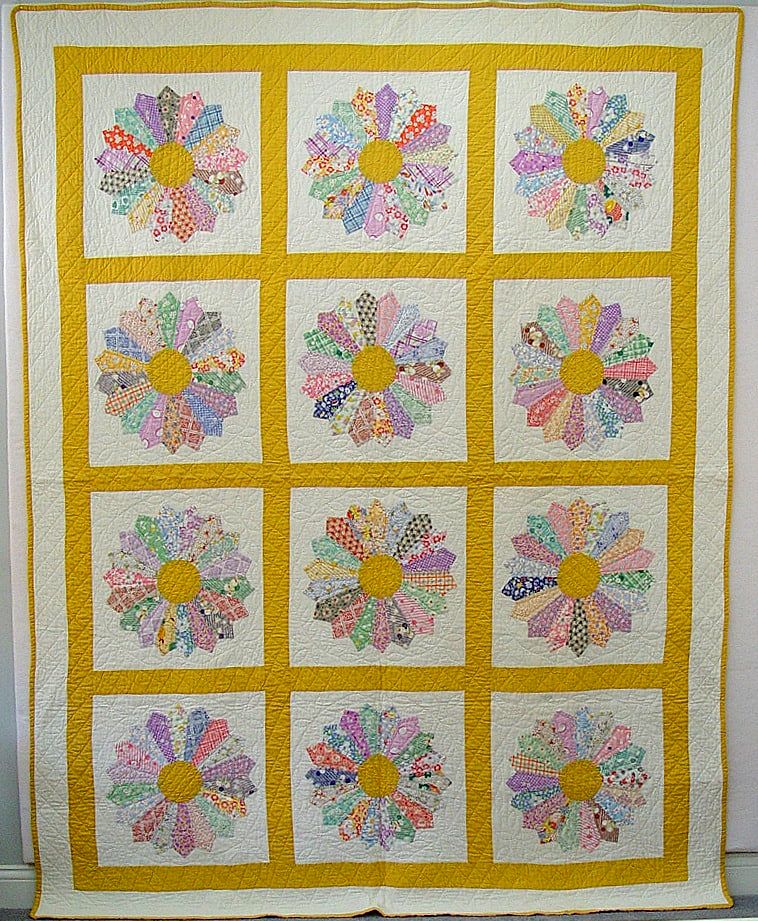
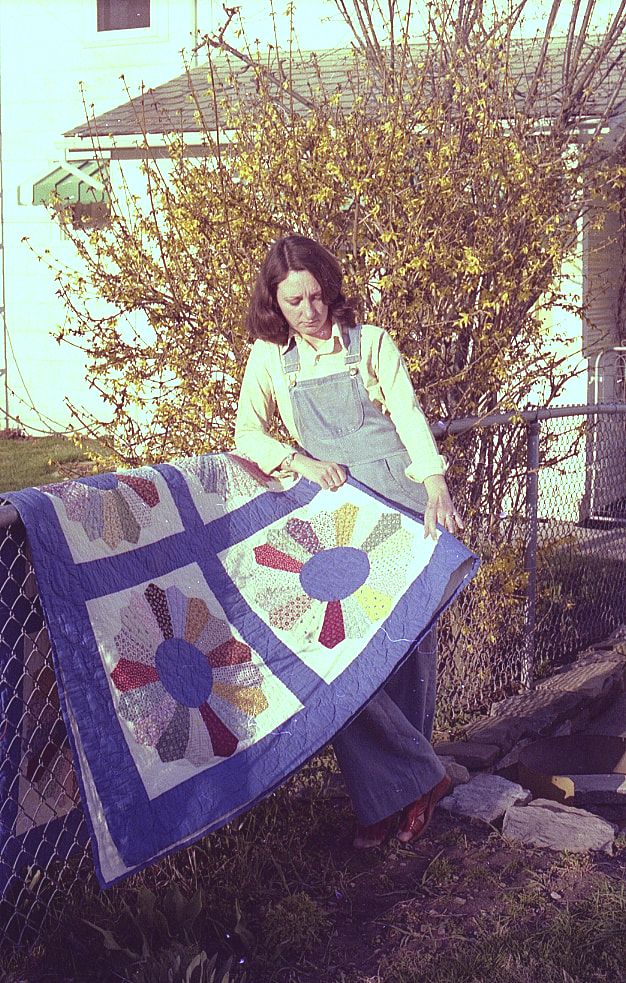
I also have a Dresden Plate quilt that Grandma made. Again, she worked in a scrappy style, but this quilt was made from new fabric, bought for quiltmaking. The blocks were set with a golden yellow solid for the sashing and borders and the quilt was quilted by hand.
Picture

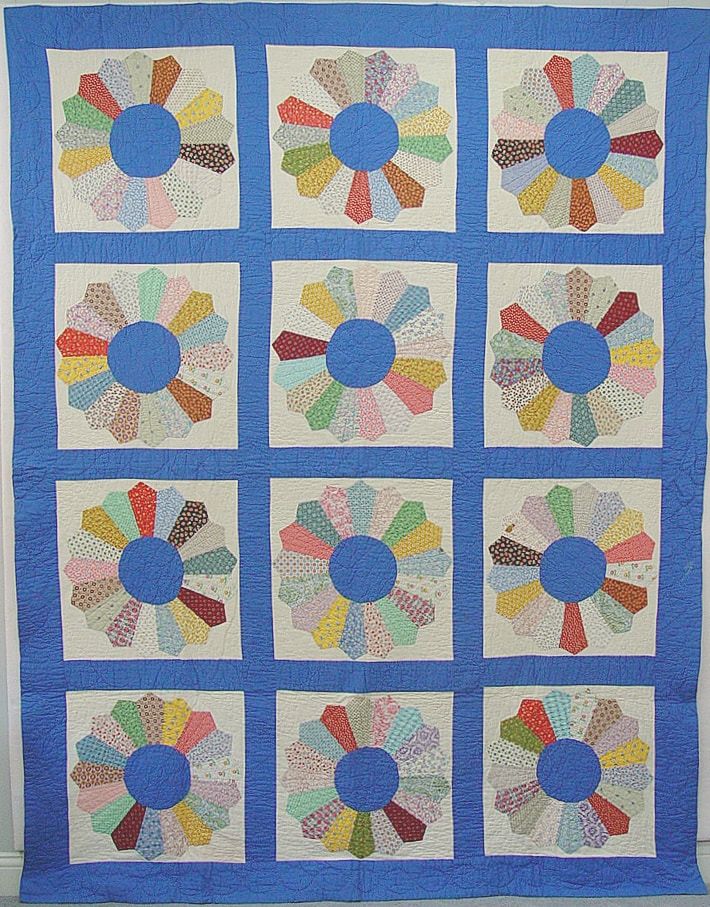
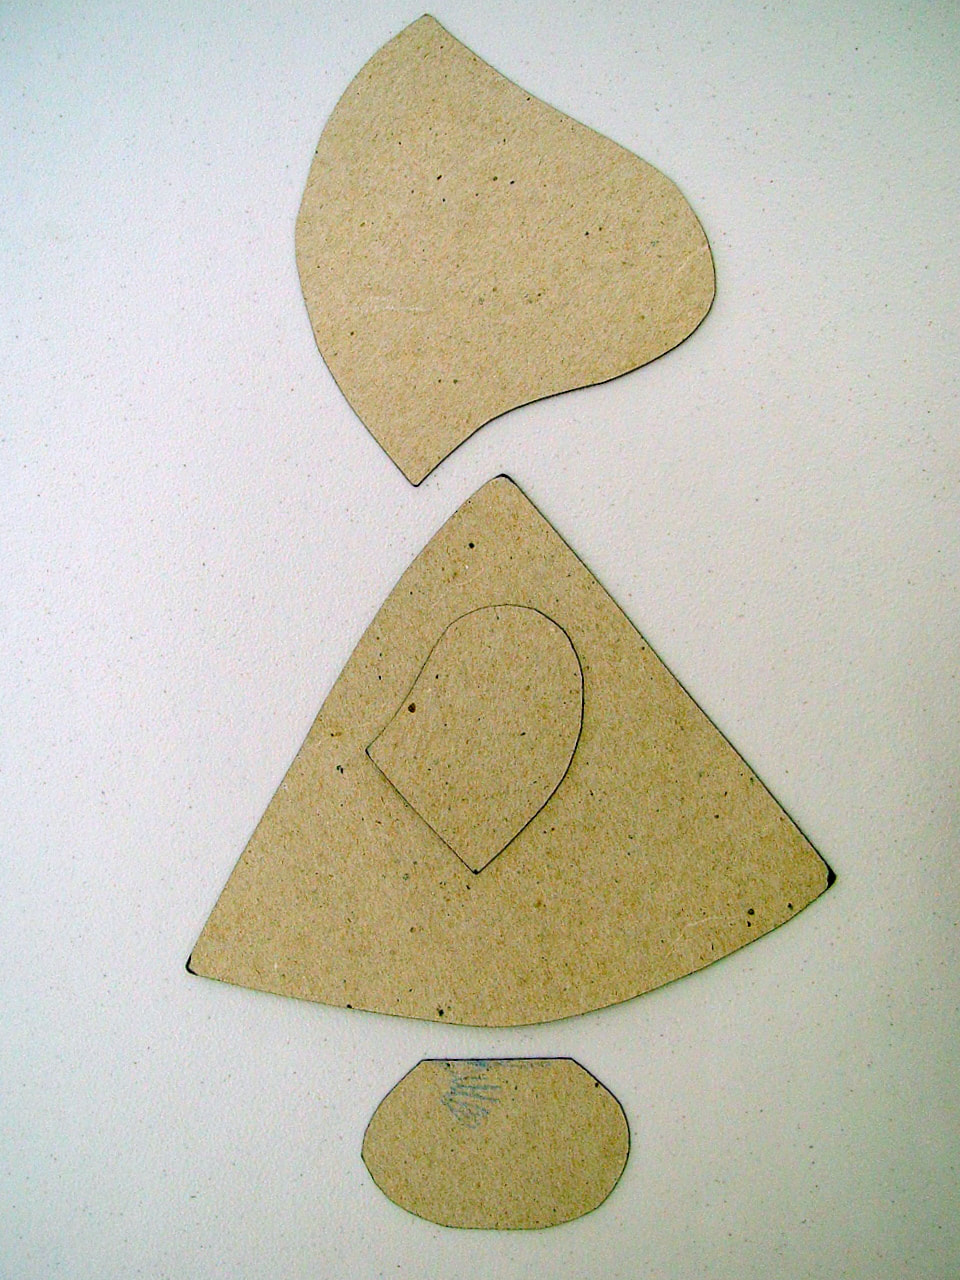
I was still in college when I decided I wanted to make a quilt. Grandma was no longer here to help with the task, but Aunt Gini had saved all of the scraps and cardboard templates Grandma had used. Her Dresden Plate was the pattern that appealed to me; I chose to make mine scrappy, too, and many of the fabrics I used came from Grandma’s trunk. One cardboard wedge was all I had to work with. I traced with a pencil, cut pieces with scissors and stitched them together by hand. I remember loving the process of laying pattern against pattern and joining them into something complex and beautiful.
Picture
Picture

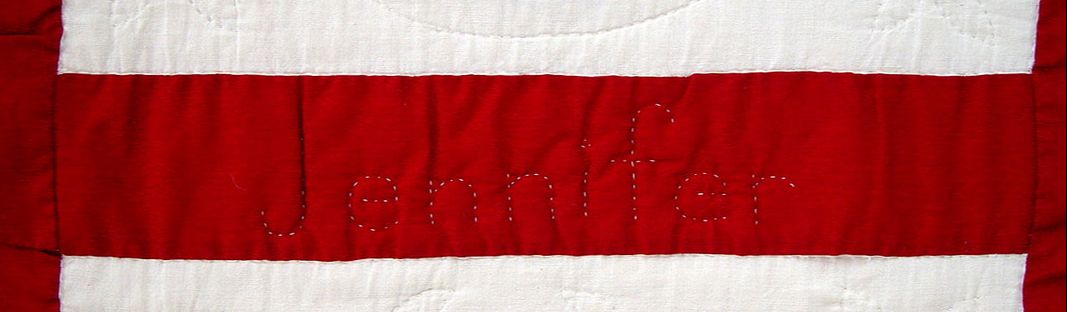
A few years later, when I was married and had little girls, I felt ready to try my hand at quiltmaking again. Following the inspiration from Grandma, I made two Sunbonnet Sue quilts for my two daughters. My Sues were made from family fabrics. I used more of the fabrics from Grandma’s trunk, some from Aunt Gini, summer dresses that my mother had worn, a shirt that my little brother had outgrown, and scraps from my own dressmaking. I used Grandma’s cardboard templates and did the work by hand. To personalize the quilts, I quilted each girl’s name into the sashing. 
Picture
Picture
Picture
Picture
For me, quilting has grown from an interest in my family history, to a hobby, and now a profession. I still stitch by hand, but I also use my sewing machine and a longarm quilting machine. I love all of it and frequently combine the different methods in the same quilt.
​
By today’s standards, those first quilts would seem to have little value. But, I feel fortunate to have had that early, traditional beginning and I’m still drawn to antique quilts and their stories.
1 Comment

Sky

1/25/2021

0 Comments

 
The author, Washington Irving, said that people who live in cities have about as much chance of seeing the sky as a frog in a well.
I did enjoy the humor in that, but now, life in the country has proven it to be so true.
We have windows in the kitchen and in the sunroom that face east. I love the morning sun, but the Eastern exposure also give us incredible beauty we would not see if we lived in town.
Picture
Picture
Picture
The sunrise here is spectacular at any time of year. The long horizon and big sky show us so many colors. 
Picture
Picture
Picture
End of day is equally beautiful,
​as the moon rises over the pond.
Picture
Picture
Picture
And we are frequently blessed with rainbows! Always colorful, often double, and sometimes we get the full display, side to side.
Don't forget to get up, look up, and enjoy the beauty.
​Anita

0 Comments

Roast Beef Au Jus and Roasted Vegetables

1/22/2021

0 Comments

 
Picture

I had several requests for the recipes for this meal, so here it is! I used my Instant pot and oven but you could do it all in the oven, if you adjust the timing on the roast.
Homemade bread and apple butter would be good with this.
Maybe next time.....

Beef Au Jus
1 T oil
2 lb rump roast
3 garlic
2 large onions, sliced into thin rounds
1 cup chicken or beef stock
1 t. rosemary
1 t. thyme
1 large bay leaf
(note: I would double the amount of herbs for a larger roast.)}

1 T soy sauce or tamari
1 T Worcestershire sauce 

Set pot to sauté and brown the meat on all sides. 
Remove it from the pot.

Sauté the onions 3-4 min. Set aside half of them for later. 
Sauté the garlic and herbs for 1 minute.
Add the stock and deglaze the pan, scraping up the browned bits.
Add soy sauce and Worcestershire sauce. 
Return the meat to the pan.
45 min pressure cook and 25 min natural release.
Strain the broth and add reserved onions. Cook for several minutes to reduce the broth and tenderize the onions.
Slice the meat and serve with the broth and onions. Or, seriously, put the broth over everything :)
​It's delicious! 


Picture
Picture
I added small red potatoes to this meal. They were placed on the baking sheet with oil, salt and pepper and roasted for 25 minutes before adding the green beans and mushrooms.
Roasted Garlic Green Beans and Mushrooms*
1 pound green beans
4 oz shiitake or Portobello mushrooms
2 cloves garlic, peeled
1 T extra virgin olive oil
1/2 tsp kosher salt
1/2 tsp freshly ground black pepper
Preheat the oven to 400 F.  Wash, dry, and trim the ends of the green beans.
Slice the mushrooms in large bite sized pieces. Mince the garlic. Add olive oil, salt and pepper and toss to coat the vegetables.
Spread on a baking sheet and place in the oven. Roast for 20 minutes or until the green beans are tender.

A gardener's note:: the green beans I used in this meal were an heirloom French filet bean called Jade. We grew them last year for the first time. They have great flavor, fresh, canned, and frozen, and I already have them ordered and waiting to plant again this summer.
0 Comments

Bed Linens Recycle

1/22/2021

0 Comments

 
Picture
Before Christmas, I had intended to buy 2 twin sheet sets and finish this project for Addi's new
big girl bed.
With 2 sets, she would have 2 fitted sheets, 2 pillow cases and one quilt made from the 2 flat sheets.
I didn't find any children's sets that appealed to me and most sheets these days seem to be poly-blend or microfiber, which I didn't want to use. And so the project was delayed a bit.

When I donate to thrift shops, I also like to go inside to see what's there. I felt lucky to find a set of blue, twin size, 100% cotton sheets and a white flat sheet in very good condition. There was no pillow case included, but I bought the 3 pieces and got to work.
The first step, of course, was to wash everything. Then I pinned the white sheet onto my longarm table and layered batting and then the blue flat sheet on top. I kept both hems at the bottom, hoping to be able to use them later.
Picture
Blue flat sheet, white flat sheet, blue fitted sheet.
Picture
I chose my Baltimore Birds E2E pattern to quilt the layers together.
For my Statler peeps, I set it up in Repeat Patterns and used End of Set to Continue.

Picture
To make both sides seem like the right side, I quilted with a silver/gray variegated King Tut on top and a light/med blue variegated King Tut on the bottom. Both had good contrast against the fabrics and there was no worry about contrasting colors popping through to the other side because they would match the fabrics there.

Picture
I had about 13" left from the length of the blue sheet, from which I cut 5 binding strips. While I prefer to cut binding on the bias, this was a make-do situation and the cross grain was soft and very nice to work with. After that, I was left with the original hem and a bit of fabric measuring about 6 1/2", which I used for the pillow case trim.

Picture
A standard pillow case measures 20" x 26", so I needed to create ​a white rectangle approximately 
42" x 21". 
After opening the hem on the white sheet, I had 15" width to work with. Not enough to make the pillow case from 2 pieces, so again make-do, I used 3 pieces 15" x 21" sewn together with French seams, to make the white portion of the pillow case.
Picture
The 6 1/2" blue hem piece was enough to make the total length I needed.
Photo shows adding the blue hem to the white section with a French seam.
This final piece was trimmed to 42" x 21".

A side French seam and bottom edge French seam finished it all.
Picture
The finished pillow.
​
​I used French seams in the construction of the entire pillow case. I like the clean, finished look of a French seam and I think they may hold up better with the the use and abuse a pillow gets.
​
See below for step-by-step instructions.

Making a French Seam
Picture
Sew WRONG sides together with 1/4" seam. This will go against logic and you will question it every time, but Wrong sides together for the first step.
Picture
For fine dressmaking the first seam would be cut back to 1/8", but for a pillow case, I prefer to leave the full 1/4". Press the seam open.
Picture
Fold the layers together with the seam exactly on the edge facing you and press again. The pressing is important in preparing a good flat edge for the final seam.
Picture
Stitch again 3/8" from the folded edge to enclose the raw edges for a clean look inside the pillow case.

I feel good about being able to keep these textiles out of the landfill. Whether you use new or recycled goods, I hope you'll try this project for a special little one in your life.
​Anita

0 Comments

Birdseed Wreath

1/18/2021

0 Comments

 
We keep bird feeders out all year 'round, but now in the deep cold, is really the time to think about our feathered friends. Here's a cute way to offer birdseed to them.
Picture

​​
Birdseed Wreath


1 pkg gelatin
1/2 cup water
3 T light corn syrup
3/4 cup flour
4 cups of birdseed
​of your choice

Most of the wreaths I have made in past years were done with a commercial mixed seed. This week, I decided to use Black Oil Sunflower seeds to attract finches, cardinals, blue jays, and woodpeckers. And I made one with corn as an experiment. In the end, I've found that the larger seeds have too much space between them to hold together well, so the millet mix is probably the best way to go with these wreaths.

Here's the step-by-step for making them, whichever seed you decide to use. Have fun!
Picture
Dissolve 1 packet of gelatin in 1/2 cup cold water.
Picture
Add 3 Tablespoons of light corn syrup and mix well.
Picture
Stir in 3/4 cup of flour.
Picture
Add 4 cups birdseed of your choice and mix well to coat.
Picture
Picture
Spray the inside of a 4 cup Bundt pan and fill it with the prepared mix. Spread the seed around and pack it firmly to guarantee a solid wreath.

​​Let it dry for 24 hours before turning it out of the pan.
Then dry another day or two until it feels solid to the touch.

Choose a spot you can see from a favorite window and use a sturdy ribbon or small length of rope to tie your wreath to a post or a tree. I used one of the double seam cut-aways from my recent denim recycle to tie this one to a bird feeder post outside my kitchen window. 

0 Comments

Bang Bang Shrimp

1/11/2021

1 Comment

 
Picture
I made this for dinner a few nights ago. It's an easy recipe to put together, quick to cook, and delicious. The mayo and the chili sauce balance each other nicely, creating a creamy sauce with just a touch of heat. Adjust the red pepper flakes according to your own taste. It is good on regular spaghetti and on the whole grain noodles, as well. We have fresh basil under grow lights during the winter, and it was the perfect garnish for this dish, but parsley would be pretty. This recipe will serve 6 people. Enjoy!
Bang Bang Shrimp
1/2 cup mayonnaise
1/2 cup Thai sweet chili sauce
2 cloves of garlic, minced
2 T lime juice
1/8-1/4 t. crushed red pepper flakes
1 T onion powder


1 lb spaghetti or other noodles. I used Soba noodles in the photo shown above.

1 lb shrimp or diced chicken breast
1 T olive oil
3 cloves of garlic, minced
3 T paprika
1 T fresh basil
Black pepper to taste

Mix sauce ingredients and set aside.

Cook pasta and drain.
Combine pasta and sauce and turn to coat well. 

Saute shrimp or chicken with garlic, paprika, and pepper until no longer pink. Serve shrimp on top of noodles. Garnish with fresh basil.

1 Comment

A Gardener and a Quilter

1/8/2021

1 Comment

 
Picture
Below is the first article I wrote for American Quilter Magazine in 1992. I find it surprisingly insightful, considering the state of the world today. Over the years, my focus on gardening has increased and I have added several new approaches to my quilting, but I still try to find a balance, spending time on both of these things. 
Enjoy, Anita
 
"I am a gardener and a quilter. A good combination, I think. Both give me the same pleasure and sense of accomplishment. They satisfy my creative needs and provide something tangible for my family. There is order, pattern and color in each one. Both are long term projects and I enjoy watching them grow.
 
I like to think that growing our own food gives us a little bit of self sufficiency. That if the world suddenly changed, I could still put food on the table. There is comfort in that.
 
Quilting may be even more important than food to me.  Reflecting on this idea of self sufficiency, I thought if I were suddenly cut off from civilization, I could still quilt. I would miss my goose neck lamp, but natural light is really the best anyway. Since my work is almost all done by hand, I could live without my sewing machine. All I need is my needle and thread.
 
But what about the needle?...and the thread?...and the fabric? What would I do if I could no longer buy those wonderful fabrics and my favorite little betweens? I know that it is possible to spin and weave, but after all of that, would I really cut it into thousands of pieces to be sewn back together again? How could I make all of the quilts still waiting inside my head? It made me thankful for all of the people who make these things available to me.
 
I will continue to garden, to work and wait and watch it grow. But I feel lucky to be able to buy, at a moment’s notice, anything I need to make my quilts. If the grocery stores close, I can still feed my family, but without my quilting, my soul would surely starve."

​Wishing you a new year of abundance and gratitude.

1 Comment

Planning the Garden

1/7/2021

0 Comments

 
I'll be ordering garden seeds soon, so I thought I'd share with you some of the things we have learned over the years and how we make our choices about what we grow.
Picture
I took a picture of some of the seed packets we have left from last year. You can see that I order from a number of different places. Many offer the same heirloom varieties; most have hybrids that are widely available or specific to them. I like a good variety in the vegetables I grow; each one can have it's own growth habit, growing time, size, shape, and flavor. I'll talk about some of those differences below. Be sure to read the descriptions when you are looking through the seed catalogues to be sure what you receive will work for you.

Besides the new seeds that I order, I also save unused seeds from the previous year and they generally grow very well for us. And, we save seeds from the heirloom vegetables that we grow. Depending on your climate, you may need to take measures to keep them viable, but I generally just put them into my expanding file/folder, sorted alphabetically. To test old seeds, you can fold a few up in wet paper towel and keep them moist for a few days or longer to see how many sprout. If a percentage of them begin to grow, you should be able to trust them for a garden planting.

Now... what do all of the the descriptions mean and how do we make the best choices? First of all, don't grow things you don't like :) If you are just starting a garden, choose things you and your family will want to eat. From the beginning,(1976) our family gardens were huge because we like everything, but maybe tomatoes, peppers, salad greens, green beans, and summer squash would be good beginnings.

Space requirements: Some things like radishes and leaf lettuce take up very little space. Others, like zucchini, will easily take over a 4-6 sq. ft. area. Cucumber and winter squash vines can run on forever......

Climate, of course will be a consideration in not only when you plant, but the time to maturity of each vegetable. Sweet potatoes, for example can require hot weather for 100 days or more and may not do well for us here in northern Ohio. Our greenhouse extends our season for about one month in the spring and one in the fall, if I plan my planting times carefully. Hot caps, or covered boxes can do the same.

And then, it's important to know how much produce you will get from one seed. My husband's favorite story is about hearing a girl in a farm market tell someone that she thought one seed would produce one zucchini, so he should buy a lot! Oh my! I bet he was surprised! Some vegetables like radishes, carrots, beets, turnips, lettuce, spinach, and cabbage produce one vegetable. Others like tomatoes, peppers, and green beans produce a plant that will give you many vegetables over a period of time.

Heirloom varieties are those that have been around for many years. Their seeds are "true" and they will produce the same plant and vegetable year after year. They also seem to have the best flavor and that's what we grow them for after all.

Hybrid types were developed after WWII, when people started buying produce from larger grocery stores, instead of neighborhood markets or growing their own. Commercial markets demanded produce in large amounts, all the same size, shape, and color. Plant breeders began cross-pollinating different varieties of the same vegetable - tomatoes for example - to produce a new variety that would be more productive, more disease resistant, or produce the whole crop at the same time for more efficient harvesting. All of those things are good and may be important to you.

Organic seeds may be either of the above, but that label means the crop producing the seeds for sale was grown without pesticides, herbicides, etc. What you do with them after that is up to you.


GMO seeds are relatively new and produced by altering genes within the seed itself to grow only under certain conditions. These are reserved for commercial growers and you need not worry about finding them in suppliers who are offering seeds for your backyard garden. Nor would you want them.

I always receive a large number of garden catalogues in the mail. These days, it's just as easy to search on line for suppliers. I order my favorites, read descriptions on what's new, and usually order from several different places. I would suggest that you start early. Take the time to study the offerings, but don't hesitate too long. Because of the events of last year, many more people started growing gardens and supplies quickly became difficult to find. Of course, the farm stores and other big box stores will have seeds and supplies in a month or two, but if you are looking for specific items, it's best to get started now.
0 Comments

Shrimp Flatbread - A White Pizza

1/6/2021

1 Comment

 
Last night's dinner was a flatbread pizza with smoked cheese and shrimp. It was light and yummy!
Here's how I made it.
Picture
Homemade crust:
recipe below.
The next layer was a smoked gouda spreadable cheese. We like herb/garlic, too. 

Picture
On top of that I put raw shrimp, mushrooms, and sweet onion. I seasoned it with my own spice mix but any BBQ seasoning would work.
Picture
The top layer was mozzarella to add that traditional, thick, stretchy goodness.
Picture
Bake at 400 for 20 minutes, until the crust is done and the cheese is browned.
Picture
We had a big salad with it. It was a nice change from the heavy meals of the last couple of months.

Pizza Crust

​3 cups all purpose flour
1 cup whole wheat flour

1 pkg active dry yeast or 1/2 T if using bread machine yeast (The difference is in how they are added to the flour. See below)
1 t. salt
1 1/3 cup warm water
2 T oil

I make mine in my Kitchenaid now, with bread machine yeast. The yeast is added dry to the flour and salt. Add the water and oil and knead for 10 minutes on level 2. 

If you are making the dough by hand, d
issolve the yeast in warm water. Mix in remaining ingredients and knead the dough for 10 minutes.

Cover and let rise for 2 hours. This amount of dough will fill two sheet pans or three round pans with a very thin crust. If you want a thick crust, use two round pans. The dough will keep well in the refrigerator for about a week, if you can wait that long to make another one.


Preheat the oven to 400 degrees. Place the pizza on a middle rack and set the timer for 18 minutes. Check at this point to see if the crust is done and top brown. If not, watch it carefully for another minute or two.
Enjoy!!


1 Comment

Collecting Antique Quilts

1/1/2021

0 Comments

 
Happy New Year! I have put the red and green quilts away and filled the old wardrobe with blue and white quilts, almost all of them made from rescued quilt tops or blocks. I'll be sharing a regular column on Quilt Rescue in my Piece and Plenty Journal, starting next month. For now, just some thoughts on collecting quilts.
Picture
Collecting antique quilts has been a long-time passion of mine. I didn’t grow up with quilts in the house, but from an early age, I was attracted to them. I fell in love with their softness and their color and pattern. I continue to be charmed by the stories connected to antique quilts and their makers. I enjoy my small sampling of nineteenth century quilts and am always looking for that next wonderful piece to add to my collection.
 
There are many good reasons to consider collecting antique quilts. For years, people have known the comfort and beauty of displaying quilts in their home. Simple scrappy quilts can add charm to an antique or country-style decorating scheme. For others, quilts are a trendy decorator item, displayed on the wall as any other piece of fine art would be. Antique quilts come in a great variety of patterns and colors; with a little searching, you should be able to find one to suit your style.
 
Quilts also have value beyond simple decoration. Quilting instructors often have a collection of antique quilts for their own study and for examples to be used in the teaching of others. The patterns and techniques used in the last century can often inspire new work being done today. Collectors and dealers buy quilts for the investment potential that they hold. I have used this rationale a few times during the purchase of a more expensive piece, but my husband reminds me that it is only an investment if you sell it again.
 
A good place to begin looking for quilts may be right at home. Many people find that quilt collections begin quite innocently with quilts given to them by family or friends. Perhaps your relatives have quilts that have come down through the family. Has someone expressed an interest in caring for these pieces? Volunteer to document their history, have them appraised and store them in a safe place. Let friends know that you are interested. As surprising as it may seem, many people are not interested in old quilts and quite often they are willing to give them to someone who will care for them and enjoy them.
 
Some people begin a collection by acquiring quilts as they come along, with no particular plan. Garage sales, flea markets and auctions are sometimes a good source for finding old quilts. If you have the time to spend, and are interested in a variety of styles, you may begin or add to a collection in this way.
 
If you are a more serious collector, your quilts may have a specific focus; perhaps you are in love with red and green applique, scrappy turn of the century darks, or the light and airy look of the 1920's pastels. Antique dealers, especially those dealing in antique quilts, can be the best source of quilts for those collectors interested in specific styles. The price will be higher, but you may be able to find just what you want.
 
Prices for antique quilts have risen and fallen over the years. Study the market so you will know what you are looking at. Condition is probably the most important factor in determining the value of a quilt. Quilt appraisers figure the monetary value of a quilt based on its condition and known history. Good advice is to buy the best that you can afford. For many collectors, sentiment can also play a big part in the importance of a quilt. Buy what you like. As your collection grows you may decide to skip the purchase of several of lesser price in order to buy a more expensive one. Another idea is to trade up; sell off several of the less valuable pieces and use the money to purchase that really special piece.
 
If you are interested in collecting quilts, the first step is to start looking. Whatever your interests, you will be able to find quilts that will fit your budget, fill your needs, and satisfy your soul.

0 Comments

    Author

    Anita has a long background rooted in traditional handwork and quiltmaking, which she still enjoys.

    Often, these days, you'll find her digitizing patterns for the Statler Stitcher and other computerized longarm quilting machines. 
     
    Her summer days are spent in the garden and she loves finding new ways to prepare good veggie-based meals.


    She's always in search of a way to balance all of those activities and find time to share with others who are passionate about the same things.

    This page is a sneak peek into what's happening in her world right now.

    Archives

    July 2021
    June 2021
    May 2021
    April 2021
    March 2021
    February 2021
    January 2021
    December 2020

    Categories

    All
    Binding
    Christmas
    Country Living
    Handmade
    Kitchen Garden
    Landscape
    Meatless Monday
    Pottery
    Quilting
    Quilt Rescue

    RSS Feed